Order Type and Order Category

If you would like to further segment your orders, you can request to have the order type & order category feature to be activated (just reach out to us by emailing help@readytoview.com). Use this feature to differentiate your orders into categories (such as jewelry, men’s, etc.) and types (such as immediate, reorder, show, etc.).


Once you have the feature available to your showroom, establish your Order Categories and Order Types under “Setup Categories.”

order type1


Click “add record” to create new order categories/types.

order type


When adding an order, you’ll be able to assign an order category, and optionally, an order type.

NOTE:
Once this feature is activated, order category is mandatory while order type is not. If you only care to use one of these features, use order categories.


order type2


Once you enter your orders with order categories and/or order types, you can filter (or sort) your orders with these 2 new attributes.

order type3


You can also filter most report results by order type and order category. The following reports have this filtering ability:

  • Top Customers
  • Sales by Mfr/Customer
  • Sales by Customer/Mfr
  • Annual Sales by Month
  • Forecasting Analysis by Season
  • Open Orders.


order type4

Saved Searches/Views

With the “Saved Searches” feature, you can save searches or views (selection of columns) you use frequently to save time having to re-enter them. This also enables you to view only those columns that are relevant to your active task.

This feature is available on the customer, order, invoice, credit memo, and notes tab.

To save a search, first make sure the current search is cleared by clicking “clear search.” Next use customize this view to select the columns you wish to show/hide. More on customize this view here. In the example below, I’m creating a custom view (choosing specific columns) for my market calls, so I’ve chosen to only see customer name, contact, phone number, last cancel date, mfr, and market call notes.

saved searches1


If you’d like to enter a specific search to save, or save a specific segment of your customers, enter the search (i.e. everyone in a certain territory, everyone who has purchased in the last year, etc.)

Clicked “Saved Searches,” then “add current search,” then enter a name for this view/search you will remember, such as “mkt calls.”

saved searches2


To load a saved search, open the “Saved Searches” drop down menu and click on the saved search label you are looking for. The page will reload with the saved column view and the search criteria originally entered.
Best Practice:
For every task you do repeatedly, have a saved search for it, whether it’s market calls, checking distribution, or sending emails. You could also have a “simple” view for quick viewing essential information and a “full/standard” view to see everything.


Sorting Customers, Orders, Invoices, Etc.

Most views (pages) in Showroom Exchange (customer, order, invoice, and notes tab, etc.) allow you to sort your entries by multiple columns. For example, you can sort your customers alphabetically by their name.

To figure out how a page is currently sorted, look at the titles of the column headers. If there is a number with a green arrow above or below it, that means that your data is being sorted by that column (see example below) in ascending or descending order.

If the arrow is pointing up, that means that the column is being sorted alphabetically, beginning at the top and going down (A > Z). If the arrow is pointing down, the reciprocal is true (Z > A), descending order.

sorting1


To clear or reset the current sorting criteria, click on the icon of the two red arrows pointing at each other.

sort1


After clicking this icon, you can reassign the sorting criteria by clicking on the column header title you’d like to sort by. For example, if you want to sort by state, click on “State” column header. If you’d like to sort by this column in the opposite direction, click on the title again to reverse the order. Click once more to remove sorting on the respective column.

sort2


If you want to consider a second sorting criteria, click on the title of the second column you’d like to sort by. For example, if you’d like to sort by state and within each state, you’d like to sort by customer name, first click on “State,” then click on “Customer.” Note the label 1 & 2 signifying the order of the sort.

sort3


Related: Want to skip the wait time when sorting multiple columns?


Customizing Your Excel PO Import

The video below is a demo of how you can adjust the excel order import template to fit your showroom’s identity. Most importantly, it covers cell names in excel, their significance, and how you can move/edit/delete them to your liking.

This article is related to the Excel Order Import Add-On feature. More on this feature here.

https://youtu.be/OfyeltpUjPQ

Import Excel Orders/POs Add-On

We’ve released a new add on that will allow showroom reps/users the ability to bulk import orders from excel sheets.

By entering your orders on an excel sheet, you not only save paper and make your business “greener,” but you can save time by not having to re-enter all of the information again into Showroom Exchange! Much like the Joor/NuOrder Import Module or the Invoice Import Module, you can import a large number of excel files at once, saving you time.

Once the feature is activated, go to the reports tab to import Excel Order Files

excel imports1


The following page is where you can select your Excel file or .zip file of multiple Excel files to import into Showroom Exchange.


A template of a PO Excel sheet is provided for your convenience, select the “Click Here” link to download the sample template file.

excel imports4


Below is the template Excel Order File that downloads when you click the link:
Excel Order Template


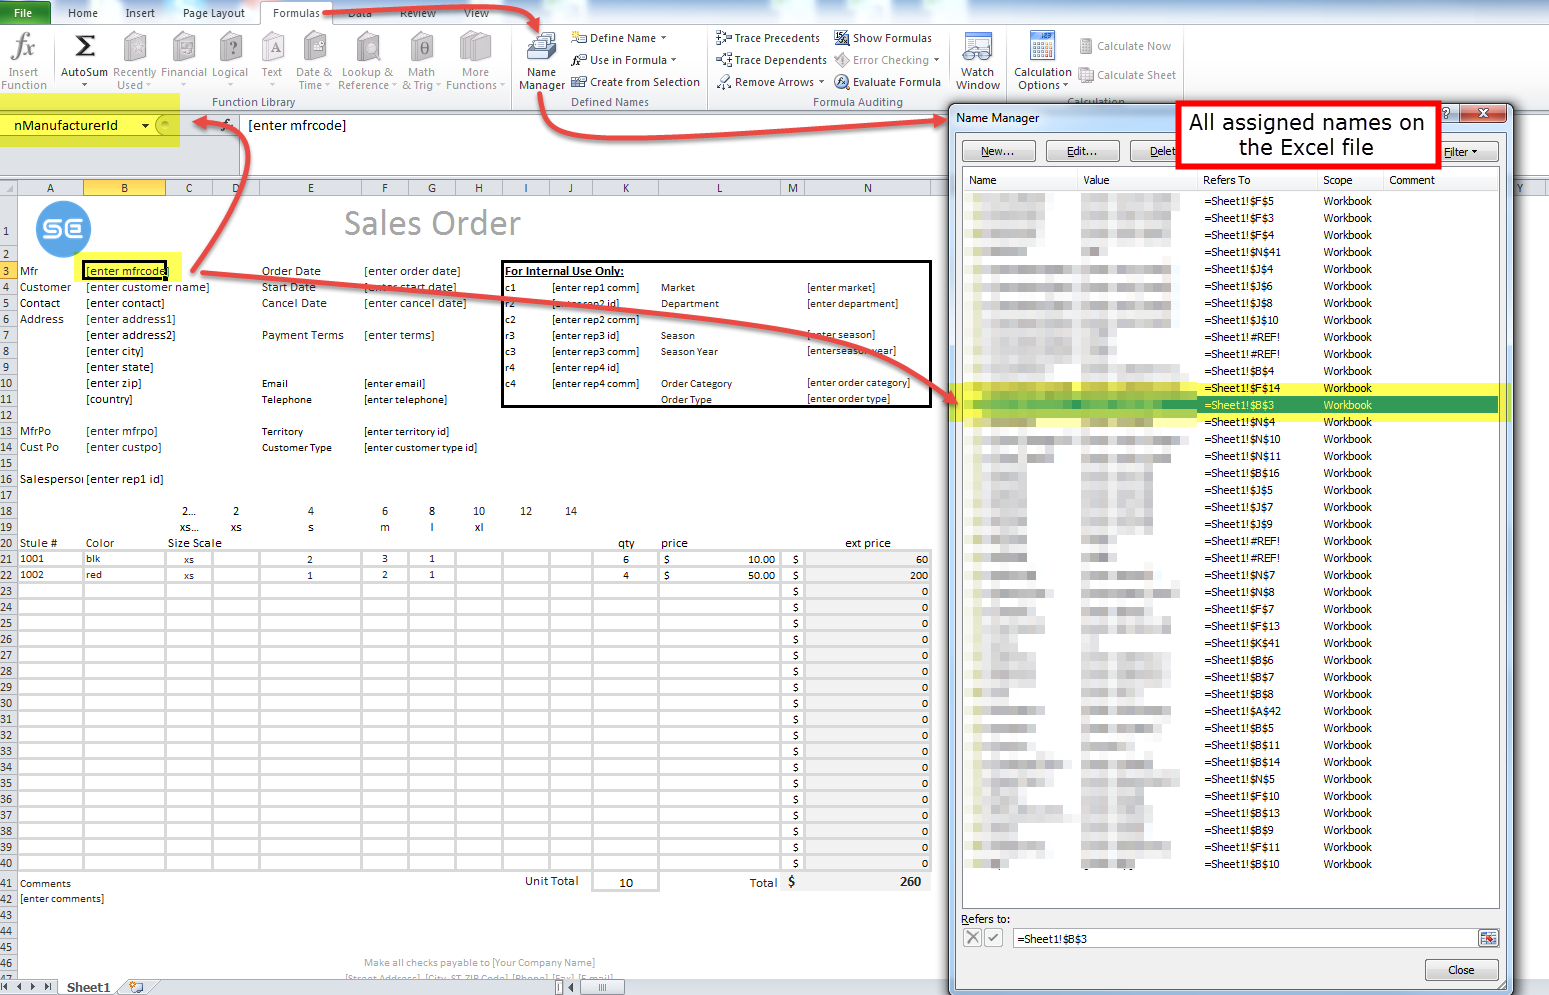
You can customize the Excel file for your showroom. you can change the logo, change the layout, etc.However ALL NAMED cells must also be included in your custom version. You can move these cells around, just make sure the name stays the same.

To be clear, the NAME of a cell is different than the value entered in the cell.

See the image below for a list of all of the cells with assigned names, as well as an example of a name in Excel.

excel imports9


Note: In the grid that contains the actual order, we use Excel mathematical equations to provide a unit total and an amount total to import into SE.

Once you have imported an excel file or a .zip file of Excel files, you will be taken to the page depicted below to verify your customer information and fill in any information that might have been missing from the Excel PO.

1) If the system is not recognizing a customer that is already an existing customer, select the “Assign” option to link the row to an existing customer.

2) “Map” means that this aspect of the customer has yet to be assigned. Click “Map” to select the correct value for the customer. If you try to save the customers and you see the warning “Please map customer data,” this suggests that there are still unassigned/missing values for the respective customer row.

3) Click “List Orders” to go to the next page

excel imports6


The order edit page is very similar to the previous page- here you can make edits, as well as add info that might not have been on the Excel PO, e.g.; rep, commission etc. Here too, you’ll find the “Map” option if something is missing on the excel order. If you can’t process the orders when you click “Import Orders,” look at the column on the far right to see an explanation as to why the order could not be imported. Make the edits to then properly save the orders.

excel imports 7


After clicking “Import Orders”, you’ll be taken to a confirmation page where you can see if your orders and customers were imported or not.

excel imports8

Order Scans

Showroom Exchange offers the ability to upload order scans as an optional feature.
Keep an electronic copy of the original order on file with the version you entered into Showroom Exchange to stay organized.

To upload order scans, click “maintain order scans” on the order tab.

order scans


Make sure all orders go by the file name “mfr^po#” (i.e. if the mfr code is ab, and the po# is 1234, the file name should be ab^1234).

To add order scans, you can 1) add just one at a time by clicking “add record,” 2) add several, about six, at the same time by clicking “add multiple records,” and 3) by uploading a .zip file by clicking “upload zip files.”

order scans1


Uploading order scans by .zip file is the most efficient way of uploading multiple order scans.

Once you have a group of orders you want to upload, highlight them all in windows explorer (or finder in mac os x) and convert them into a zip file. For Windows computers, right click the highlighted files, hover cursor over “send to,” and click “compressed zip.” More on Method 1 here: http://www.wikihow.com/Make-a-Zip-File

For OS X, visit: http://support.apple.com/kb/PH13964

The name of the zip file does not matter.

After clicking “upload zip files,” select the .zip file to upload. Showroom Exchange will add the order scans to the orders in the system. It will also tell you which files could not be uploaded (often because they haven’t been entered into Showroom Exchange yet).

You can also add order scans by clicking on the icon of a page with a green plus arrow (see below). Once an order scan is added, you can see the image by clicking on the icon of the sheet of paper. You can email the scan by clicking on the sheet of paper with the envelope icon over it.

order scans2


You can also add order scans when entering an order (see below).

order scans3